
TECHNOLOGY
How to Enable AJAX Filtering Without Page Reload in WooCommerce?
AJAX filters in WooCommerce can make online shopping feel fast and smooth. They let users change product options like size, price, or color without reloading the page. If you’re trying to improve your store, you might already be wondering how to enable AJAX filtering without page reload in WooCommerce?
Enable AJAX filtering in WooCommerce without reloading by using Dynamic AJAX Product Filters. Add filters with widgets, shortcodes, page builders, or PHP. This allows shoppers to filter products live without page reloads, improving speed, user experience, and product visibility.
Want to know which method is best for your store setup or how to avoid common mistakes while setting it up? Keep reading—this article covers everything you need to know about AJAX filters in WooCommerce.
How to Enable AJAX Filtering Without Page Reload in WooCommerce?
To enable AJAX filtering without page reload in WooCommerce, one of the best solutions available is using the Dynamic AJAX Product Filters plugin. This powerful tool allows shoppers to filter products by attributes, price, categories, and more, without reloading the page. You have four easy installation options to get started:
 1. Using the Widget Method
If your WooCommerce theme supports widget areas like sidebars or footers, this is a simple and effective way to add AJAX filters. It doesn’t require coding and works well for store layouts that rely on classic WordPress widget zones. All filter settings can be adjusted through the widget interface, giving you quick control over how filters display. This method suits shop owners who want a fast setup using the WordPress dashboard. Let’s go through each step in more detail below.
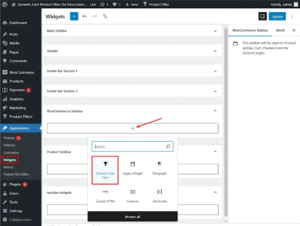
Access the Widgets Section in WordPress
Navigate to your WordPress dashboard and click on Appearance > Widgets. This section allows you to manage all available widget areas on your site, such as sidebars or footer zones. You’ll see a list of available widgets on the left and your theme’s widget-ready areas on the right. Make sure your theme supports widgets before proceeding with this method. You’ll need to choose a suitable area where filters will be useful for shoppers.
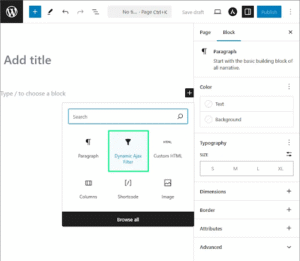
Find and Add the Dynamic AJAX Product Filters Widget
Look for the widget labeled Dynamic AJAX Product Filters in the list of available widgets. Make sure your plugin is installed and activated to see this option. It’s usually easy to locate by name or icon if the plugin is properly installed. Once you find it, drag and drop the widget into your desired sidebar, shop filter area, or other widget zone. This step places the live filter form directly in that section of your website. After placing the widget, you’ll be able to adjust its filter options.
Configure Filter Settings in the Widget
Inside the widget settings, you can configure filtering by categories, price range, attributes, or custom taxonomies. Select the filter types that match your store’s product structure and user needs. You can also arrange the filter order and label styles to better suit your design. These settings directly control what users see and interact with in the filter section. Carefully setting this up ensures a clean and intuitive shopping experience.
Save Your Changes and Preview
Once your filters are configured, scroll to the bottom of the widget area and click Save. This action stores your filter settings and activates them for the chosen page or section. To test them live, visit your store page and try using the filters without reloading. AJAX functionality ensures that the product grid updates instantly. If it doesn’t work as expected, check for plugin compatibility with your current theme.
2. Displaying Filters with a Page Builder
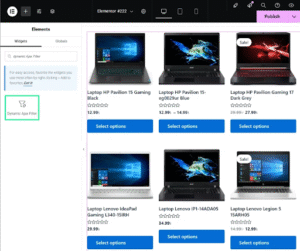
If you’re using a modern visual builder like Elementor, WPBakery, or Divi, this method offers great design flexibility. Page builders allow you to add filter elements anywhere on the page, not just in sidebars. It’s an ideal choice for online stores with custom-designed product pages or landing pages. You can visually control layout and filter styles without touching any code. Here’s how to do it step by step.
Open the Page or Post for Editing
Go to your WordPress dashboard and open the page where you want filters to appear. Use your preferred page builder to launch the editing interface. The filters work well on shop archive pages or any custom product listing layout. Make sure you are editing a page that displays WooCommerce products or relevant listings. Starting with the correct page ensures your filters have the desired impact.
Add a New Section or Row in Your Layout
In the page builder, create a new section, row, or column where you want to place the filter element. You might want to reserve space at the top, left, or right side of the product grid. Placing it strategically helps customers see it quickly and use it easily. Keep in mind your layout’s balance to avoid overcrowding. Once the space is ready, move on to inserting the filter element.
Search for the Filter Module or Widget
Use the builder’s element panel and type Dynamic AJAX Product Filters into the search bar. If the plugin is installed correctly, the filter widget should appear in the list of draggable elements. Drag it into your section or column where you want the filters to show. This lets you place the WooCommerce product filter in any layout without relying on sidebars. Some builders may allow advanced styling options for spacing and mobile responsiveness.
Configure and Customize the Filter Module
Once placed, click on the module to adjust its filter types and display settings. You can enable filtering by price, product tags, stock status, or specific attributes. Many page builders let you style fonts, spacing, and alignment directly from the sidebar panel. These visual controls allow a consistent brand look across your shop. After final adjustments, click Update to save your page.
3. Adding Filters with a Shortcode
Shortcodes offer a fast way to place dynamic filters inside any post, page, or product archive. This method works great if you want filters inside custom WooCommerce pages without using a builder or widget. It’s flexible, easy to implement, and perfect for non-developers who are comfortable using WordPress blocks or classic editors. You can place the shortcode anywhere text or blocks are supported. Let’s break down how to use this option effectively.
Insert the Filter Shortcode into Any Page
To enable filters, just paste the shortcode [plugincy_filters] into your page or post editor. This could be a product listing page, a custom shop layout, or a landing page. Use the WordPress block editor or classic editor to place it where the filters should appear. This instantly activates the plugin’s live filter display at that location. It’s as simple as adding a block of text.
Use Block or Classic Editor for Placement
You can use either the Gutenberg block editor or the classic WordPress editor to place the shortcode. In Gutenberg, just insert a Shortcode block and paste it inside. In the classic editor, paste it directly into the content box where appropriate. Avoid placing it inside a product description, as it may not render properly there. The shortcode works best on full-width or column-based pages.
Customize the Filter Behavior Using Parameters
If needed, the shortcode can be customized using parameters from the plugin’s documentation. Parameters can include things like product categories, filter styles, or AJAX behaviors. These tweaks help you fine-tune what users see and how the filters act. Always test your changes to ensure the parameters are working correctly. Be sure the plugin supports AJAX filtering through shortcodes.
Preview and Save Your Filter Page
Once the shortcode is placed and customized, click Publish or Update on your page. Visit the frontend to test the filters in action. AJAX filtering will load results in real-time without reloading the page. If something doesn’t appear as expected, double-check the shortcode syntax. This method is lightweight and avoids extra design tools.
4. Using PHP Code to Display Filters
For developers or those comfortable with theme customization, this method offers full control. You can embed the AJAX filters directly in your WooCommerce theme files using PHP. This is ideal for creating custom templates or integrating filters into hardcoded layouts. It’s the most flexible approach for advanced store customization. Follow the steps below to implement filters manually.
Identify the Theme File for Filter Placement
Choose the appropriate theme file where the filters should be displayed, like (sidebar.php, header.php), or a custom WooCommerce template. Use FTP or a file manager to access these files safely. Always create a child theme or backup before editing core files. Filters can be placed near your product loop, in a sidebar area, or even within modals. Proper file targeting ensures the filters appear in the right place.
Insert the PHP Shortcode Function
In your selected theme file, add the following PHP line where you want filters to appear:
<?php echo do_shortcode(‘[plugincy_filters]’); ?>
This function executes the same shortcode mentioned earlier, but from within PHP. Place it inside a container div if you need styling hooks. The shortcode will generate real-time filters at runtime. Save the file before uploading or refreshing.
Upload the Edited File to Your Server
If you made changes locally, upload the updated file back to your server using FTP. If editing within WordPress, use the built-in Theme File Editor to save changes directly. Always clear your cache and refresh the site after making updates. This ensures the new PHP logic is loaded properly. Errors in code placement may prevent your site from displaying.
Check the Filter Display and AJAX Function
Visit your site and test the filters in the area where you added the PHP code. Products should update live as you select or deselect filter criteria. If the filters don’t appear, verify the shortcode syntax and theme file structure. You can also enable debug mode to see any PHP or plugin issues. When done right, this method creates a seamless integration of AJAX filtering into any layout.
Why Use AJAX Product Filters in WooCommerce?
It’s nice to see results quickly when shopping online. This section discusses why AJAX product filters are useful and how they can improve any WooCommerce store. Let’s take a look at the key reasons behind it all.
Faster Page Updates
AJAX filters let the products change instantly when someone clicks on a filter, like price or color, without reloading the whole page. This saves time and makes shopping quicker and easier. People don’t like waiting for pages to load again and again. The faster the product list updates, the better the experience feels. A smoother page keeps people browsing longer and buying more.
Better Shopping Experience
Filters that don’t require reloading are easier to use. Shoppers can change filters without getting lost or confused. They see results right away, which makes it fun to explore more products. It’s less frustrating, especially on slower internet. A good experience means people are more likely to find what they want and leave happy. And that’s always good for any store.
Works Well on Mobile
Most people shop using phones these days, and AJAX filters help make that easy. Since there’s no need to reload the page, it saves data and works faster on mobile. Users can apply filters with just a few taps and still get quick results. It feels smooth and clean, which is perfect for small screens. Mobile-friendly filtering helps keep people shopping longer.
Helps Find Products
When a store has lots of products, filters are really helpful. They let people choose only what they’re interested in—like picking a size or style—without scrolling forever. AJAX filters update the list in real-time, which makes it easier to find something specific. It also helps stores highlight the right items quickly. Shoppers get to what they want with less effort.
Increases Sales Chances
If people can easily find what they want, they’re more likely to buy it. AJAX filters make that happen by giving quicker, clearer results. It keeps users from getting bored or clicking away. A better shopping experience often means more sales and fewer abandoned carts. Making things simple for customers always pays off in the end. It’s a smart upgrade for any store.
It’s easy to shop online with AJAX product filters. WooCommerce filters can really improve your store’s performance, save time, and make shoppers happy. This increases the chances of a sale and keeps shoppers happy.
WooCommerce AJAX Filters vs. Standard Filters: What’s the Difference?
You should be aware of how standard filters differ from AJAX filters when setting up filters in WooCommerce. It’s important to understand how each option works and how they differ so that you can choose the right one for your site. Here’s a comparison chart that breaks it down clearly.
| Feature | Standard Filters | AJAX Filters |
| Page Reload | Reloads the entire page | Updates products without reload |
| Speed | Slower filtering process | Fast and real-time filtering |
| User Experience | Basic and old-style | Smooth and modern |
| Implementation | Easy to set up | Takes more setup and adjustments |
| Compatibility | Works with most themes/plugins | May need specific themes/plugins |
| Flexibility | Limited design and control | More control over filter behavior |
As you can see, AJAX filters offer a smoother and faster experience but may need more setup. Standard filters are easier to use, but feel outdated and slower. Choosing the right one depends on your store’s goals and setup. If you want a more modern shopping experience, AJAX is usually the better pick.
Common Mistakes to Avoid When Setting Up AJAX Filtering
People will have a lot easier time shopping on your website with AJAX product filters. They help visitors narrow down what they want without reloading the page. The filters might not appear or work properly if something goes wrong. Here are the most common mistakes people make.
- Non-Global Attributes: Product filters often fail when attributes are created for individual products. They need to be added globally under product settings to work correctly.
- Theme and Plugin Conflicts: Some themes or plugins might break how filters work. Try switching to a default theme or turning off other plugins to find the issue.
- JavaScript Errors: Filters won’t update if the page has JavaScript problems. Use your browser’s developer tools to spot and fix any script errors.
- Caching Problems: Cached pages might stop new filter results from showing. Make sure your caching tools skip pages that use filters for smooth updates.
- Wrong Filter Settings: Filters can act weird if they’re set up wrong. Always check the plugin’s guide to make sure you’re using the right settings and display options.
- Too Many Filter Options: Giving users too many filter choices can slow things down and cause confusion. Stick to filters that help the most.
- Pagination or Scroll Issues: Some scroll features or page changers don’t work well with filters. Use tools that support AJAX or adjust your settings for better results.
A good filter setup makes your store easier to use and keeps visitors happy. If filters don’t work, it can make shopping frustrating and lead to lost sales. It’s better to fix small issues before they grow into big problems. Take the time to review your setup and keep your store running smoothly.
Final Words
Making your WooCommerce store easier to shop should never feel complicated. AJAX filters bring that ease by showing results instantly, making the entire shopping experience smoother and faster. Whether you’re a beginner or a developer, setting them up is flexible and doesn’t require advanced skills. From simple widgets to PHP code, you have options that fit your site structure.
If you’re wondering how to enable AJAX filtering without page reload in WooCommerce? The answer is by using tools like Dynamic AJAX Product Filters available as widgets, shortcodes, or even via code. They update your product listings instantly, without reloading the page, making the site faster and more user-friendly. This increases sales and helps shoppers find what they want quicker.

The first time I heard the word Hellooworl, it came from a founder who looked both excited and uneasy. He had just closed his laptop after another long day of video calls and Slack threads, and he said something that stuck with me. “We are more connected than ever,” he said, “but we rarely feel understood.” That tension between constant connection and genuine human engagement sits at the heart of Hellooworl. It is not a product in the narrow sense, nor just another digital trend. It reflects a deeper shift in how technology is beginning to re-center itself around people, context, and early trust.
In its simplest form, Hellooworl represents a philosophy of building technology that starts with human connection rather than scaling metrics. For entrepreneurs and tech leaders, this idea is gaining traction because it speaks to a growing fatigue with hollow engagement. Users sign up quickly, click often, and leave just as fast. What they rarely do is form a lasting bond with a platform or a brand. Hellooworl challenges that pattern by asking a different first question: how do we create meaningful connections early, before growth becomes the main obsession?
Understanding Hellooworl in a Crowded Digital Landscape
The digital economy is full of tools designed to optimize speed, reach, and efficiency. Most startups are taught to chase rapid user acquisition and worry about depth later. Hellooworl turns that logic around. It argues that early-stage connection, when a user first encounters a product or service, shapes everything that follows. Trust, loyalty, and advocacy do not magically appear at scale. They are built through early experiences that feel personal and intentional.
What makes Hellooworl stand out is its resistance to over-automation. While it embraces modern technology, it avoids reducing people to data points too quickly. Founders experimenting with Hellooworl-inspired approaches often slow down onboarding, invite conversation, and design systems that listen before they push. This may sound counterintuitive in a world obsessed with growth curves, but the results can be surprisingly durable.
Why Early Connections Matter More Than Ever
In an age of artificial intelligence and algorithmic feeds, early impressions are amplified. A user decides within minutes whether a platform feels trustworthy or disposable. Hellooworl places weight on those minutes. It treats the first interaction not as a funnel entry, but as the start of a relationship.
From a business perspective, this has real consequences. Companies that prioritize early connection often see lower churn and more organic growth. Word of mouth becomes credible when users feel seen. Investors are also paying attention. They increasingly ask not just how fast a product grows, but why users stay.
Culturally, this shift reflects broader changes in how people work and live. Remote teams, global customers, and digital-first relationships all demand clearer signals of intent. Hellooworl responds by encouraging transparency and empathy early in the journey.
Hellooworl as a Framework for Founders
For founders, Hellooworl is less about branding and more about decision-making. It influences how teams design onboarding, customer support, and even internal communication. The idea is to create alignment early, before habits harden and complexity grows.
This framework often leads to smaller but more engaged communities in the beginning. Instead of chasing every possible user, founders focus on those who resonate deeply with the mission. Over time, this clarity becomes a competitive advantage.
The table below highlights how a Hellooworl-driven approach contrasts with more conventional early-stage strategies.
| Aspect | Traditional Early Growth | Hellooworl Approach |
|---|---|---|
| Onboarding | Fast, automated, generic | Slower, contextual, human |
| User Focus | Quantity of sign-ups | Quality of connection |
| Metrics | Clicks, installs, reach | Retention, trust, feedback |
| Communication | Broadcast messaging | Two-way dialogue |
| Long-Term Impact | Rapid churn risk | Sustainable loyalty |
This comparison shows that Hellooworl is not anti-growth. It is pro-foundation. It recognizes that strong roots support taller structures.
Technology That Listens Before It Scales
One of the most interesting aspects of Hellooworl is how it reframes the role of technology itself. Instead of leading with features, it leads with listening. Early user feedback is not treated as a dataset to be mined later, but as a conversation happening in real time.
Some startups apply this by embedding founders directly into early support channels. Others design interfaces that invite reflection rather than endless scrolling. These choices may seem small, but they send a powerful signal. They tell users that their presence matters beyond their ability to generate revenue.
From a technical standpoint, this does not mean abandoning automation or analytics. It means sequencing them differently. Hellooworl suggests that understanding comes before optimization. When systems are built on that understanding, automation becomes more humane and more effective.
The Business Case for Hellooworl
Skeptics often ask whether Hellooworl can survive in competitive markets. The answer lies in how value is measured. Short-term spikes are easy to engineer. Long-term trust is not. Businesses that invest in early connection often discover that their customers become collaborators rather than passive consumers.
This dynamic can influence product direction in meaningful ways. Features are shaped by real needs, not assumptions. Marketing becomes storytelling rather than persuasion. Even pricing strategies can reflect mutual respect, offering clarity instead of confusion.
For entrepreneurs navigating uncertain markets, Hellooworl provides a stabilizing lens. It reminds them that technology ultimately serves people, not the other way around.
Hellooworl and the Future of Work
The relevance of Hellooworl extends beyond customer-facing products. It also speaks to how teams are built and led. Early connections within a company often determine its culture. When trust and openness are established from the start, collaboration feels natural rather than forced.
In distributed teams, this is especially important. Without shared physical space, early interactions carry extra weight. Leaders who apply Hellooworl principles tend to invest more time in listening and context-setting. The payoff is resilience during periods of rapid change.
As work becomes more fluid and less tied to location, these human-centered approaches may define which organizations thrive.
A Broader Cultural Shift
Hellooworl also reflects a broader cultural moment. People are questioning systems that prioritize efficiency over meaning. They want technology that respects attention and acknowledges complexity. This does not mean rejecting innovation. It means shaping it with care.
Media, education, and even public institutions are beginning to echo similar themes. The emphasis on early connection suggests a desire to rebuild trust that has been eroded by scale-first thinking.
In this sense, Hellooworl is both a response and an invitation. It responds to digital fatigue, and it invites builders to imagine a different starting point.
Conclusion
Hellooworl is not a silver bullet, and it does not promise effortless success. What it offers is a shift in perspective. By focusing on real connections early, it encourages founders and technologists to slow down just enough to understand who they are building for and why. In a world racing toward automation and abstraction, that pause can be a strategic advantage. The future of technology may not belong to those who move the fastest, but to those who connect the deepest, starting from the very first hello.
TECHNOLOGY
PR Public Relation Guest Post Agency Guest Posting: A Modern Strategy for Brand Credibility and Digital Authority

In the digital age, where online visibility directly influences brand success, PR Public Relation Guest Post Agency (PR) has evolved from traditional press coverage and event management into a more dynamic, content-driven practice. One of the most effective strategies at the intersection of modern PR and digital marketing is guest posting.
Guest posting—publishing content on external, high-authority websites—not only supports link-building and SEO goals but also plays a critical role in shaping public perception, building thought leadership, and enhancing brand trust. For professionals, startups, and enterprises alike, integrating guest posting into a PR Public Relation Guest Post Agency plan has become an indispensable tactic for long-term brand positioning.
Understanding Guest Posting in the PR Context
Traditionally, PR focused on managing the flow of information between an organization and the public. It was about getting stories into newspapers, interviews on radio, or features on TV. However, the digital shift has changed how audiences consume content. People now turn to blogs, digital publications, industry websites, and social media for insights and updates.
This shift has broadened the definition of PR. It’s no longer limited to media relations—it includes content marketing, thought leadership, influencer partnerships, and most notably, guest posting on authoritative platforms.
Guest posting in PR involves writing and publishing valuable, non-promotional content on websites that align with your industry or target audience. The goal is not just exposure, but positioning your brand or spokesperson as a credible authority, while also subtly driving traffic and improving SEO rankings through contextual backlinks.For more information please contact this email: toppublicrelation@gmail.com
Why Guest Posting Matters for Public Relations
Here’s why guest posting is a vital tool for modern PR Public Relation Guest Post Agency:
1. Establishing Thought Leadership
Credibility is currency in the digital world. When a company’s executive or representative contributes an article to a respected industry site, it reinforces their position as a thought leader. Readers trust websites they follow, so your message carries more weight when published externally than when posted on your brand blog.
Guest posting allows PR professionals to tell their story proactively, providing meaningful commentary on industry trends, innovations, and challenges—before the competition does.
2. Controlling the Narrative
Guest posts offer a powerful form of narrative control. Instead of relying on third-party journalists to interpret your press releases or statements, you get to shape your message directly. With guest posting, your voice becomes the official voice of record, helping prevent misrepresentation or dilution of the message.
This control is especially critical during product launches, rebranding efforts, crisis management, or shifts in company strategy. A well-placed article on a trusted platform can clarify your intentions, inspire confidence, and reduce misinformation.
3. Link Building and SEO
From a technical PR standpoint, backlinks are one of the strongest ranking factors in search engine algorithms. Guest posts are a natural way to earn these links, especially from high-authority domains.
When your content is published on a DA 70+ website and links back to your homepage or landing page with relevant anchor text, it improves your search engine visibility, increases referral traffic, and amplifies your online authority.
PR isn’t just about being seen in the news—it’s about being found when your audience is searching. Guest posting bridges this gap effectively.
How to Use Guest Posting Strategically in PR Campaigns
For a guest posting strategy to support your PR goals, it must be executed with precision. Below are key steps to follow:
1. Define Your PR Objectives
Are you looking to boost brand awareness? Rebuild reputation? Introduce a new product? Increase executive visibility? Your goals will shape the types of websites you target and the content themes you develop.
2. Target the Right Platforms
It’s not just about quantity—it’s about quality. Target websites that:
- Have high Domain Authority (DA)
- Are relevant to your industry or niche
- Have engaged audiences
- Accept guest contributions
Examples include platforms like Entrepreneur, Inc., Business Insider, or niche-specific blogs and publications with loyal readerships.
3. Create Valuable, Non-Promotional Content
Guest posts should never be overt sales pitches. Focus on educating, informing, or solving a problem. Showcase your expertise subtly while delivering genuine value. Content that reads like an article in Forbes, not an ad, will resonate better and be more widely accepted.
4. Craft a Strong Author Bio
The author bio is where you can place a branded backlink and provide credentials. It should reflect the authority of the spokesperson and give readers a clear reason to trust or follow the company.
5. Track Impact and ROI
Track metrics like:
- Referral traffic from guest post backlinks
- Organic keyword rankings
- Brand mentions and citations
- Media coverage triggered by guest post visibility
- Lead generation and conversions
These indicators help measure the real PR impact of guest posting campaigns.
Best Practices for Public Relations Guest Posting
To maximize the benefits of guest posting within your PR strategy, keep these best practices in mind:
- Personalize your outreach:Avoid mass-pitching editors. Tailor your pitches to show familiarity with the site’s tone and topics.
- Stay consistent:Publish regularly, not sporadically. Consistency builds recognition.
- Update your posts:Offer evergreen content, but revisit and refresh when necessary.
- Leverage social media:Share guest posts across LinkedIn, X (Twitter), and Facebook to extend reach.
- Build relationships with editors:Guest posting can open doors to broader PR opportunities like interviews, collaborations, and features.
The Future of PR: Content-Led Brand Building
The era of PR being reliant solely on press releases and journalists is long gone. Brands are now media companies, and their content is their currency. Guest posting fits perfectly into this model, offering a direct channel to communicate with audiences, control messaging, and build digital authority.
In the coming years, we’ll continue to see the fusion of PR, SEO, and content marketing. Agencies and internal teams that understand how to craft compelling guest posts and secure premium placements will lead the conversation in their industries.
Moreover, as AI and automation evolve, the human element—trust, credibility, and storytelling—will matter more than ever. Guest posting remains a tool where human perspective and professional authority can truly shine.
Conclusion
PR Public Relation Guest Post Agency today is a multidimensional effort that includes strategic content distribution, relationship-building, and digital visibility. Guest posting is a core pillar of this strategy—one that not only enhances online authority and improves SEO but also builds real, lasting brand trust.
Whether you’re launching a brand, repositioning a business, or strengthening your digital footprint, guest posting should be an integral part of your PR toolkit. It delivers value beyond a single post—contributing to your brand’s voice, influence, and credibility in a way few other tactics can.

The Future of E-commerce Is AI-Driven
In 2025, customer expectations are evolving faster than ever. E-commerce brands are now competing on speed, personalization and round-the-clock availability. That’s where an AI Chatbot Development Company steps in. With AI transforming customer service, these companies enable businesses to deliver smarter, faster and more human-like support.
Today, 80% of retail and e-commerce businesses are either using or planning to implement AI chatbots. Additionally, the AI chatbot market in e-commerce is expected to reach $2.1 billion by 2032, driven by its ability to streamline operations, reduce costs and boost customer satisfaction.
Furthermore, an AI Chatbot Development agency equips brands with intelligent, automated support systems trained to sound like their brand, respond instantly and retain customer loyalty. Thus, for any business owner tired of answering repetitive questions, chatbots offer the perfect solution.
What Does an AI Chatbot Development Company Offer?
An AI Chatbot Development agency builds smart virtual assistants tailored for e-commerce platforms. These chatbots perform essential functions while saving businesses time and money. Additionally, here’s what they typically offer:
24/7 Customer Support: AI chatbots are always available to help since they never sleep.
Product Recommendations: They personalize suggestions based on browsing behavior.
Order Tracking: Customers get real time updates without contacting human agents.
Multilingual Communication: Breaks language barriers for global markets.
Cart Recovery Campaigns: Reminds customers to complete purchases.
Instant Query Handling: From FAQs to refund policies, bots manage it all efficiently.
Thus, by partnering with a professional AI Chatbot Development Company, brands receive custom built solutions that align with their tone, branding and goals.
How AI Chatbots Are Transforming E-commerce Customer Support
E-commerce customers expect quick responses and relevant solutions. That’s where AI chatbots shine. Additionally, these bots are trained on a company’s knowledge base, FAQs and customer workflows, providing accurate answers instantly. Thus, here’s how they transform customer support
Faster Response Times: Chatbots answer within seconds, reducing wait time.
Scalability: Handle thousands of conversations without needing more staff.
Brand Consistency: They reflect your tone and speak like your business.
Reduced Human Errors: AI systems ensure consistent and factual responses.
Lower Support Costs: Businesses save up to 30% in customer service costs.
Furthermore, a trusted and experienced AI Chatbot Development Company like Proxmate Solutions ensures bots can grow with your business and adapt to changing customer needs. That flexibility is very important in a competitive market.
Why Every E-commerce Business Needs AI Chatbots in 2025
Customer behavior in 2025 demands innovation. Today’s consumers use voice search, prefer messaging over calling and expect instant gratification. AI chatbots meet these demands by integrating seamlessly into websites, apps and messaging platforms.
Furthermore, here are the top reasons to invest in chatbot development
Consumer Trends: Most customers prefer messaging platforms over emails or calls.
Conversion Boost: Bots help customers check out which boosts sales.
Lead Qualification: Chatbots gather user data and segment customers.
Customer Retention: Personalized responses improve satisfaction and loyalty.
Voice Search Optimization: Modern bots work well with voice commands.
This is why hiring an AI Chatbot Development Company is no longer optional. It’s a strategic necessity.
Why Choose Proximate Solutions as Your AI Chatbot Development Company?
With over 20+ years of experience, Proximate Solutions stands out among AI chatbot providers. They are committed to quality, innovation and results-driven services. Whether you’re a startup or an established enterprise, their custom chatbot solutions fit businesses of all scales.
Reasons to hire Proximate Solutions
Proven Experience: Decades of expertise in AI and automation.
Sales-Focused Strategy: They build chatbots that convert, not just communicate.
Affordable Global Services: Competitive rates with top-tier service quality.
Always Up-To-Date: They embrace new AI trends to keep you ahead.
Custom Training: Their bots are trained on your brand tone, FAQs and workflows.
Furthermore, tired of answering repetitive customer queries? Proximate Solutions creates AI-powered chatbots that retain customer engagement, reduce response time and sound exactly like your brand.
Key Benefits of Hiring an AI Chatbot Development Company
Working with an AI Chatbot Development agency offers distinct advantages. Here are the key benefits that e-commerce businesses gain:
Increased Customer Satisfaction: Bots resolve issues quickly and accurately.
Boosted Efficiency: Agents can focus on complex cases while bots handle routine queries.
High ROI: Chatbots reduce support costs and drive conversions.
Brand Loyalty: Personalized interactions build stronger customer relationships.
Seamless Integration: Bots can be added to Shopify, WooCommerce, Magento and more.
Thus, choosing the right partner ensures you make the most of your AI investment. That’s where Proximate Solutions proves its value repeatedly.
A Look at the Future: AI Chatbots and Rising Expectations
By 2025, customers will expect businesses to be available 24/7, responsive and conversational. AI chatbot integration addresses all of these demands.
As the AI market grows, businesses that adopt early will have a competitive edge. AI-powered bots will not just assist but anticipate customer needs, becoming virtual shopping assistants.
Furthermore, future-ready e-commerce brands will use AI to:
- Predict customer preferences
- Handle high volume shopping events
- Improve post purchase engagement
- Offer hyper personalized support
Moreover, brands can successfully adjust to these developments with the help of professionals like Proximate Solutions. Their strategic approach to chatbot development ensures long term growth.
Conclusion: Build the Future of Customer Support Now
It’s very important to match customer expectations in the rapidly evolving world of e-commerce today. AI chatbots do more than answer questions; they build trust, drive sales and elevate brand experience. Thus, the businesses that recognize this shift and partner with an expert AI Chatbot Development Company will lead the way.
Furthermore, Proximate Solutions is one of the best choices to start this journey. With a proven track record, global reach and sales-focused strategies, they help e-commerce stores thrive in the AI-powered era.
Thus, don’t let your brand fall behind. Invest in AI chatbot solutions that speak your brand’s language, serve your customers 24/7 and power your business into the future.
Frequently Asked Questions (FAQs)
- What is an AI Chatbot Development Company?
It’s a company that creates intelligent chatbots using artificial intelligence to automate customer support and sales processes.
- Why do e-commerce stores need AI chatbots in 2025?
Customer expectations demand instant responses and 24/7 support which AI chatbots provide efficiently.
- How much does it cost to hire an AI Chatbot Development Agency?
Costs vary, but companies like Proximate Solutions offer competitive pricing tailored to your business size.
- Can AI chatbots increase my e-commerce sales?
Yes. They assist during purchase decisions, offer upsells and remind customers to complete abandoned carts.
- Are AI chatbots compatible with Shopify or WooCommerce?
Absolutely. An experienced AI Chatbot Development agency can integrate bots into all major platforms.
- How do AI chatbots personalize customer experiences?
They use browsing history, previous orders and user preferences to offer tailored product suggestions.
- How secure is customer data with AI chatbots?
Top companies follow strict data protection protocols and ensure GDPR and CCPA compliance.
-

 TECHNOLOGY2 years ago
Elevating Game Day Eats: A Guide to Crafting Crowd-Pleasing Sliders
-

 ENTERTAINMENT2 years ago
wave_of_happy_: Your Ultimate Guide
-

 FASHION2 years ago
GPMsign Fashion: Redefining Style with Purpose
-

 TECHNOLOGY2 years ago
Trader Joe’s Dayforce: Revolutionizing Workforce Management
-

 FOOD2 years ago
Altador Cup Food Court Background: A Culinary Extravaganza Unveiled
-

 SPORTS2 years ago
Score Chaser Sporting Clays: A Thrilling Pursuit of Precision
-

 HOME IMPROVEMENT1 year ago
What Kitchen Renovation Companies Offer Beyond Basic Remodeling
-

 NEWS2 years ago
Nyl2 Kemono: Unveiling the World