
BLOG
Signs of Hidden Water Damage You Should Never Ignore

Water damage isn’t always obvious. In many cases, serious issues can linger behind walls, beneath flooring, or inside ceilings, quietly causing structural damage and creating the perfect environment for mould growth. Learning to spot the subtle signs early can make all the difference in preventing major repairs.
In this article, professionals offering emergency plumbing assistance at 1192 N Johnson Ave, El Cajon, CA 92020 will walk us through some of the most important hidden water damage signs you should never ignore.
1. Musty Odours Without a Clear Source
A persistent musty smell in your home often signals hidden moisture. Even if you can’t see any water damage, trapped moisture behind walls or under floors can create the perfect breeding ground for mould and mildew. The odours tend to linger and worsen over time, especially in closed spaces like basements, bathrooms, or behind cabinetry. It’s easy to dismiss the smell at first, but ignoring it can lead to bigger structural problems later. Whenever you notice a mould without an obvious cause, it’s smart to investigate furtherDiscolourationnation or Staining on Walls and Ceilings.
Brownish, yellow, and grey stains on walls and ceilings are classic signs of water intrusion. These stains might start small and grow gradually as the leak continues to spread. In some cases, the surface may bubble, flake, or feel damp to the touch. Even freshly painted walls can reveal stains if the underlying issue hasn’t been properly addressed. Catching these early can prevent the need for major drywall or ceiling replacements down the road.
3. Warped or Buckling Floors
Floors that suddenly feel uneven, soft, or warped could point to water damage beneath the surface. Wood, laminate, and even some types of tile flooring can absorb moisture over time, causing them to swell, lift, or separate. You might notice changes when walking across a room – a subtle “give” underfoot or slight ridges along seams. Ignoring these signs could eventually compromise the entire flooring system. Acting quickly helps preserve the structural integrity and avoids extensive tear-outs.
4. Peeling or Bubbling Paint
When walls or ceilings start to peel, crack, or bubble, hidden water is often the culprit. Moisture disrupts the bond between the paint and surface materials, causing visible defects. While a poor paint job could also cause peeling, widespread or sudden bubbling almost always points to a deeper issue. Peeling paint is especially concerning in bathrooms, kitchens, and areas near roofs or windows. If you see these symptoms, it’s a good idea to have a professional inspection.
5. Sudden Spike in Water Bills
If your water bill increases without a clear reason, you could be dealing with a hidden leak. Even small leaks inside walls or under flooring can waste hundreds of gallons over time without obvious signs like puddles or dripping sounds. Pay attention to any unusual changes in your utility statements from month to month. A professional plumber can use specialised equipment to detect leaks without cutting into walls unnecessarily. Addressing these leaks early can save you both money and major repair headaches.
6. Unexplained Mould Growth
Finding mould in random corners of your home often points back to a hidden water problemMouldld needs moisture to thrive, so its presence suggests that water is entering your home where it shouldn’t. Even if the visible mould is small, it could be the tip of the iceberg. In some cases, hidden mould colonies can be extensive and harmful to your indoor air quality. If you smell without an obvious source of moisture nearby, it’s time to investigate for concealed water damage.
7. Changes in Wall or Ceiling Texture
Walls or ceilings that feel spongy, saggy, or uneven could be harbouring trapped moisture. Water weakens drywall and other materials, making them lose their rigidity over time. You might notice small dips, bulges, or even hairline cracks forming as the materials shift. Left unchecked, this kind of damage can lead to complete ceiling collapses or wall failures. Regularly inspecting and lightly pressing on suspicious areas can help you catch problems before they escalate.


Thinking about giving your space a fresh look? Paint is fine, and plain wallpaper can work—but floral wallpaper might just be the easiest way to add life, charm, and personality to any room. It’s not only pretty; it can also completely transform how your home feels. Whether you’re aiming for cozy, dramatic, or bright and breezy, floral designs can help you get there.
Many homeowners are also drawn to materials with a tactile feel. Some, like natural fiber wallpaper, add layers and warmth to walls. They add depth and warmth. This feel works well with floral designs.
Why Floral Wallpaper Still Works
Floral patterns have been around for centuries, and they keep coming back for good reason. They’re versatile. Floral prints come in many looks. Some are small and vintage. Others are big and modern. So whatever your style is, there’s a floral print that will work.
They also bring nature indoors. In a time when we spend so much time inside, being surrounded by organic patterns and soft lines makes a big difference. A room with a nature-inspired design tends to feel more relaxing and lived-in.
And forget the old-fashioned stigma. Today’s floral wallpaper is nothing like your grandmother’s. It’s bold, sophisticated, and often used by top interior designers. You can find it in high-end hotels, restaurants, and editorial-style homes.
Where to Use Floral Prints
You don’t have to go all-in to enjoy the impact of floral wallpaper. Even one accent wall can shift the mood of a room. Here’s how different rooms can benefit:
Best Rooms for Floral Wallpaper:
- Bedrooms– Use soft florals in calming colors for a restful, cozy feel.
- Living rooms– A large-scale floral print behind the sofa can act like artwork.
- Bathrooms– Powder rooms are perfect for trying bold florals.
- Dining areas– Floral wallpaper creates a more welcoming and vibrant space.
Matching Floral Wallpaper with Other Styles
Floral wallpaper blends surprisingly well with other textures and elements. For instance, try mixing it with rattan furniture, metal finishes, or even concrete for a layered look. Pairing it with floral wallpaper from a trusted collection helps ensure good quality and a pattern that fits your vision.
If you love farmhouse or cottagecore interiors, small blossoms in soft colors work well. For modern homes, look for abstract or oversized flowers with strong contrast. Dark floral wallpaper works great in dramatic, moody spaces like a reading nook or a dining room with rich woods.
Tips to Keep It Balanced
Floral wallpaper is expressive, so it’s important to keep the rest of the room balanced. If your wall pattern is busy, go light on furniture details and colors. Simple shapes and neutral tones help the wallpaper shine without overwhelming the room.
Good lighting makes a big difference too. Natural light softens florals during the day, while warm indoor lighting adds coziness in the evening. Don’t forget—wallpapers with metallic details can reflect light beautifully, adding even more depth to the space.
Pros and Cons to Consider
Like any design choice, floral wallpaper comes with a few things to weigh.
Pros:
- Instantly adds personality and mood to a space
- Works with many styles from vintage to modern
- Helps define the function of a space (like a reading corner or vanity wall)
- Huge variety of colors, scales, and designs
- Easy to use in both bold and subtle ways
Cons:
- Can overwhelm small spaces if used on all walls
- Might require professional installation depending on the material
- Needs thoughtful coordination with furniture and decor
How to Start Small
If you’re unsure, don’t commit to a whole room. Try using floral wallpaper on:
- Just one feature wall
- The back of shelves or cabinets
- A hallway or entryway
- Inside a closet or wardrobe for a hidden surprise
Peel-and-stick versions are great if you’re renting or just want to try it out first. And if you’re feeling creative, you can even frame sections of wallpaper like art.
Final Thoughts
Floral wallpaper is more than a decorative trend—it’s a design tool. It helps you tell a story in your space. It brings movement, softness, and nature into rooms that otherwise might feel too plain or flat.
With so many options in scale, color, and style, it’s easy to find one that fits your personality and your home. Whether you go for subtle pastels or bold botanicals, you’ll be surprised by how much life a few flowers can bring to your walls.
When it comes to illuminating your outdoor spaces, few lighting options are as effective and stylish as well lights. These versatile fixtures are designed to be installed into the ground, providing a subtle yet powerful lighting effect. Whether you’re looking to highlight landscaping features, pathways, or create an ambient atmosphere, inground lights and outdoor ground lights offer a practical and aesthetic solution.
AQ Lighting provides a wide range of well lights and outdoor ground lighting options for both residential and commercial use. These lights are perfect for creating a sleek, modern look while offering functionality and durability.
Why Choose Well Lights for Your Outdoor Space?
Well lights are more than just a way to light up your yard—they can completely transform the atmosphere of your outdoor spaces. Here’s why well lights should be a part of your next lighting project:
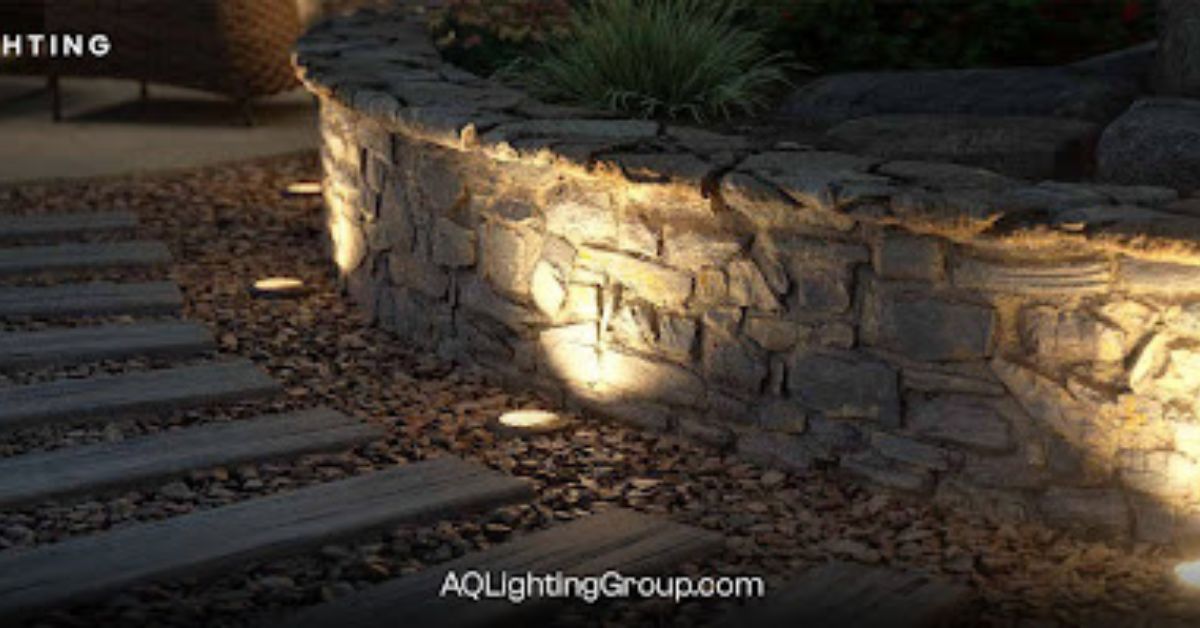
1. Subtle and Elegant Illumination
Unlike traditional outdoor lighting fixtures that sit above the ground, well lights are recessed into the earth, creating a clean and minimalist look. They provide a soft, even light that highlights your outdoor features without being overly obtrusive. Whether you want to illuminate trees, shrubs, or architectural elements, inground lights blend seamlessly into the landscape.
2. Durability and Weather Resistance
One of the key benefits of outdoor ground lights is their ability to withstand the elements. Designed for use in harsh weather conditions, well lights are built to be weather-resistant and durable, making them perfect for year-round outdoor use. Whether it’s rain, snow, or intense heat, outdoor ground lighting will continue to perform.
3. Versatility and Customization
Well lights offer unparalleled flexibility in how they can be used. They can be positioned to light up specific areas, such as paths, garden beds, or statues, and can be adjusted to create different lighting effects. Their versatility allows them to be customized to suit the specific needs of your landscape, whether you’re illuminating a small garden or a large commercial space.
4. Energy Efficiency
Many inground lights use LED technology, which provides significant energy savings compared to traditional incandescent bulbs. LED well lights are not only more efficient but also have a much longer lifespan, meaning fewer replacements and lower maintenance costs.
How to Use Well Lights in Your Landscape Design
The placement and design of well lights can greatly impact the overall look and feel of your outdoor space. Here are some ideas on how to use outdoor ground lights to enhance your landscape:
1. Highlighting Landscaping Features
Use well lights to accentuate trees, shrubs, and garden beds. By placing the lights near the base of your plants, you can create beautiful shadows and highlight the textures and shapes of your greenery. This adds depth and drama to your garden or lawn while providing soft, natural illumination.
2. Lighting Pathways and Walkways
If you have a garden path, driveway, or walkway, outdoor ground lights are an excellent way to illuminate the path without distracting from the surrounding scenery. Space the well lights along the edges of the path to guide visitors safely while adding a subtle glow that enhances the ambiance of the space.
3. Accent Lighting for Architectural Features
Well lights can also be used to draw attention to architectural elements, such as fountains, statues, or outdoor structures like pergolas or columns. Positioning inground lights at strategic points will create a striking visual effect that highlights the beauty of your property.
4. Creating Ambient Lighting for Outdoor Living Areas
For patios, decks, or other outdoor living spaces, well lights can be used to create a comfortable, inviting atmosphere. Use them to light up the corners or edges of your seating areas, adding warmth to your space without the harshness of overhead lighting.
Choosing the Right Well Lights for Your Project
Selecting the right well lights for your space is key to achieving the perfect outdoor lighting effect. Here are a few factors to consider when making your decision:
1. Brightness and Light Output
The brightness of well lights will depend on the wattage and the type of bulb used. If you’re looking to illuminate large areas, such as a driveway or a garden, you’ll need lights with higher lumen output. However, for more subtle lighting, lower wattage lights can provide a softer, more intimate glow.
2. Material and Finish
Well lights come in a variety of materials, including stainless steel, aluminum, and plastic. Stainless steel options are highly durable and resistant to corrosion, making them ideal for outdoor environments. Choose a finish that complements your overall landscape design.
3. Waterproof Rating
Since well lights are designed for outdoor use, it’s important to choose lights with a high waterproof rating. Look for outdoor ground lights that are rated for wet conditions, ensuring that they will continue to perform in all weather conditions.
4. Installation Ease
Some inground lights are easier to install than others, so it’s important to choose lights that fit your level of expertise. AQ Lighting provides easy-to-install well light’s, whether you’re doing a DIY project or working as a contractor.
Why Choose AQ Lighting for Your Well Lights?
AQ Lighting offers a diverse selection of high-quality well light’s that are built to last. Whether you’re enhancing a small residential yard or outfitting a commercial space, AQ Lighting’s outdoor ground lighting options meet a variety of needs. Here are a few reasons why AQ Lighting is the best choice for your inground lights:
- Durability and Quality: AQ Lighting’s well light’s are crafted from durable materials that can withstand all weather conditions, ensuring longevity and performance.
- Energy Efficiency: With LED well light’s, AQ Lighting provides energy-efficient lighting solutions that reduce your energy consumption while offering bright, clear illumination.
- Competitive Pricing: AQ Lighting offers affordable pricing on all its products without compromising on quality, making them an ideal choice for both homeowners and contractors.
- Customer Satisfaction: With excellent customer service and an easy returns policy, AQ Lighting is committed to ensuring your satisfaction with every purchase.
FAQs
1. What are well lights used for?
Well light’s are recessed ground lighting fixtures used to illuminate landscaping features, pathways, and architectural elements. They provide subtle yet powerful illumination while blending seamlessly into the ground.
2. Are well lights suitable for outdoor use?
Yes, well light’s are designed for outdoor use and are built to withstand various weather conditions. They are perfect for gardens, walkways, patios, and other outdoor spaces.
3. How deep do I need to install well lights?
Well light’s are typically installed 2 to 3 inches below the ground surface. Ensure that the lights are securely placed in the ground and are positioned to provide optimal illumination for your outdoor features.
4. Are inground lights energy-efficient?
Yes, many inground lights use LED technology, which provides bright, energy-efficient lighting. LED well lights have a long lifespan and use less power compared to traditional bulbs.
Looking to transform your outdoor space with high-quality well light’s? Explore AQ Lighting’s collection of outdoor ground lighting options, from inground lights to well light’s. Whether for a commercial project or a backyard upgrade, AQ Lighting provides durable, energy-efficient lighting solutions that are built to last. Shop now and brighten your outdoor spaces with style!

In this blog, we’ll explore the top 10 house warming decoration ideas that instantly impress, ranging from traditional Indian elements to modern design inspirations. These ideas are perfect for making your new home feel warm, stylish, and personal.
1. Welcome with a Beautiful Entrance
First impressions start right at the doorstep. Create a warm and inviting entryway with elements like:
- A traditional rangoli made of fresh flowers or colored powders
- Decorative torans made of mango leaves or fabric with embroidery
- A welcome mat with positive words or personalized initials
- Hanging lanterns or string lights around the door frame
This instantly sets the tone for a heartfelt celebration and makes guests feel special as they enter.
2. Light Up the Space Creatively
Good lighting is one of the quickest ways to elevate any space. Use a combination of traditional and modern options:
- Fairy lights or LED curtain lights draped along windows, balconies, or indoor plants
- Brass or ceramic oil lamps (diyas) for a traditional Indian touch
- Decorative floor lamps or pendant lights in corners
- Candle holders with scented candles to enhance ambiance and fragrance
The soft glow from these sources will make your space look magical and serene.
3. Add a Touch of Fresh Flowers
Flowers symbolize freshness, prosperity, and positivity—everything you want in your new home.
- Use marigold or jasmine garlands to decorate stair railings, doorways, or balconies
- Place flower bowls with floating petals and candles in living areas or entrances
- Use vases with roses, lilies, or orchids for a modern twist on floral décor
Fresh blooms not only beautify the space but also add a lovely fragrance that fills your home.
4. Personalize with Wall Art and Name Boards
Nothing says “welcome to our home” better than personalized touches.
- Hang a name board at the entrance with traditional motifs or minimalist design
- Use wall art that reflects your family’s story, such as framed photos or quotes
- Add Indian wall hangings like Mandala art, tapestries, or tribal paintings
This not only makes your home look thoughtful but also adds a cultural and emotional element.
5. Create a Cozy Seating Area
Make your guests feel at ease with a dedicated lounge or cozy corner.
- Use floor cushions, poufs, and low wooden stools for traditional Indian seating
- Add a rugs and throws with ethnic prints to soften the space
- Incorporate a swing or jhoola if space permits—popular in many Indian homes
- Use curtains or room dividers to create intimate corners for chats and relaxation
Comfort is key to creating an atmosphere where guests want to linger and connect.
6. Use Traditional Decorative Items
Infuse Indian aesthetics into your home using handcrafted décor elements.
- Display brass or terracotta idols, urli bowls, or candle stands
- Include hand-painted ceramics or wooden trays on tables
- Use mirror work hangings or beaded wall panels for colorful accents
- Add ethnic coasters, mats, and table runners to your dining space
These pieces not only add personality but also celebrate Indian craftsmanship.
7. Showcase Indoor Plants
Plants bring in an element of life, tranquility, and purity.
- Place indoor plants like money plant, snake plant, or peace lily in living areas
- Use hanging planters or macrame holders to save space and add height
- Choose decorative pots that match your theme—ceramic, brass, or terracotta
- Arrange succulent trays as table centerpieces
Plants also improve air quality and enhance the energy of your home.
8. Set Up a Signature Scent Corner
Scents have a powerful impact on mood and memory. Impress your guests with a beautifully-scented home.
- Use incense burners or aroma diffusers with natural oils like sandalwood or lavender
- Place potpourri bowls with dried flowers and spices
- Light scented candles in living areas and bathrooms
- Use floral waters or room sprays to refresh the space just before guests arriv
A gentle, consistent scent throughout the home adds an elegant and luxurious touch.
9. Decorate the Dining Area Thoughtfully
Guests will likely spend time around food, so the dining area deserves special attention.
- Use a centerpiece like a flower bowl, fruit arrangement, or floating candles
- Place cloth napkins, decorative trays, and coordinated tableware
- Add name cards or handwritten messages if it’s a sit-down meal
- Serve refreshments in earthenware, copper glasses, or hand-painted bowls
The dining setup is a perfect place to showcase both hospitality and taste.
10. Use Subtle Festive Elements
Even if it’s not a festival, using festive accents can make your home feel more joyous and ready for celebration.
- Drape colorful fabrics or dupattas over furniture
- Hang bells or wind chimes near windows or balconies
- Use traditional lamps or chandeliers to create a regal vibe
- Include a music playlist with soft instrumental or folk music in the background
These finishing touches subtly tie your entire housewarming theme together.
Bonus Tip: Keep It Clutter-Free
While decoration is important, avoid overcrowding your space. Leave room for guests to move comfortably. Select a few focal points and style them meaningfully. Clean lines, breathable layouts, and good flow make even a small home feel welcoming and elegant.
Final Thoughts
Your housewarming celebration is more than just an event—it’s the first story your home tells to your loved ones. With a mix of traditional charm and modern simplicity, these housewarming decoration ideas help you create an atmosphere that feels uniquely yours.
Whether it’s handcrafted wall hangings, fresh flowers, cozy corners, or beautifully lit spaces, your guests will remember the warmth and style of your new beginning. Choose the ideas that suit your space and personality, and get ready to welcome your loved ones with joy, grace, and impressive décor.
-

 TECHNOLOGY2 years ago
Elevating Game Day Eats: A Guide to Crafting Crowd-Pleasing Sliders
-

 ENTERTAINMENT2 years ago
wave_of_happy_: Your Ultimate Guide
-

 FASHION2 years ago
GPMsign Fashion: Redefining Style with Purpose
-

 TECHNOLOGY2 years ago
Trader Joe’s Dayforce: Revolutionizing Workforce Management
-

 FOOD2 years ago
Altador Cup Food Court Background: A Culinary Extravaganza Unveiled
-

 HOME IMPROVEMENT1 year ago
What Kitchen Renovation Companies Offer Beyond Basic Remodeling
-

 SPORTS2 years ago
Score Chaser Sporting Clays: A Thrilling Pursuit of Precision
-

 NEWS2 years ago
Nyl2 Kemono: Unveiling the World